An excavator radiator hose replacement should match more than two end diameters. Molded bends, end orientation, insertion depth, clamp zones and clearance from the fan, belts and hot engine surfaces determine whether the hose can carry coolant without kinking or rubbing. A hose that looks close on a workbench may twist after installation and fail early.
This guide converts a coolant leak or aged hose into a fitment record for repair and procurement. It covers fault confirmation, safe removal, geometric comparison, clamp and routing checks, and commissioning. Coolant type, pressure-cap procedure, fill method and clamp specifications must come from the engine and excavator documentation for the exact serial number.
Confirm the leak source before ordering a hose
Coolant can travel along a hose and collect far from the original leak. Inspect the radiator neck, engine outlet, thermostat housing, expansion-tank lines, drain points, clamps and nearby joints. Record dried residue, wet paths and spray patterns before washing the area. A leaking connection, damaged neck or overpressure condition can make a sound hose appear to be the cause.
Note when the leak occurs: cold soak, warm-up, full working temperature or cool-down. Record coolant level and any overheating, pressure or contamination symptoms without opening a hot system. If the hose is soft, swollen, oil-soaked, cracked, abraded or permanently flattened, photograph the condition and identify the external cause. Replacing a rubbed hose without correcting the contact point repeats the failure.
| Observed condition | Evidence to collect | Related cause to check |
|---|---|---|
| Leak at hose end | Clamp position, neck surface, insertion depth and residue | Loose or incorrect clamp, damaged neck, distorted hose end |
| Split in bend | Crack direction, bend stress and installed twist | Wrong geometry, aging, heat or unsupported movement |
| Outer abrasion | Contact witness marks and nearby component clearance | Missing clip, shield or incorrect routing |
| Soft or swollen wall | Extent of damage and fluid contamination history | Oil/chemical exposure or incompatible material |
| Collapsed section | Operating condition, internal condition and bend shape | Kink, restriction, wrong construction or system problem |
Cool and isolate the machine before removal
Park the excavator, lower the attachment, stop the engine and follow the manufacturer’s isolation procedure. Allow the cooling system to reach the specified safe condition before opening it. Hot coolant and steam can cause severe burns, and a cap or hose released under residual pressure can eject fluid suddenly.
The HSE’s maintenance guidance calls for isolation, release of stored energy and time for hot components to cool. Its thermal-hazard guidance also addresses burns from hot machine surfaces and fluids. Apply these general principles together with the excavator and engine instructions.
Capture the installed hose orientation before draining. Mark which end connects to the radiator and which connects to the engine. Photograph clamp screw positions, any anti-chafe sleeve, support clip and the hose’s relationship to the fan shroud, belts, wiring and hydraulic lines. Collect coolant in accordance with site and environmental requirements.
Turn the removed hose into a geometric template
Do not straighten a molded hose for measurement. Lay it in its relaxed shape and choose repeatable reference points. Record end inside diameters, outside diameters where clamps sit, straight insertion lengths, overall envelope and the direction of each bend. Place orientation marks on the end faces so the supplier can see whether the bends lie in one plane or rotate through space.
Photograph every printed number, brand and manufacturing code. A legible hose number may identify the part more reliably than a tape measurement, but confirm it against the machine serial number and parts catalog. If the old hose has stretched or taken a permanent set, distinguish measured worn geometry from the required nominal shape.
Caterpillar’s molded coolant-hose description explains that hose shape is selected for routing as well as fluid service. Its product-specific dimensions apply only to the named Cat part. The practical lesson for any excavator RFQ is to compare material duty, formed geometry and interfaces together.
| Geometry field | How to record it | Why it matters |
|---|---|---|
| End A and End B | Inside diameter, insertion length and connector location | Different ends may fit different neck sizes |
| Bend sequence | Annotated top, side and end photographs | A mirrored or rotated hose can twist during installation |
| Clamp zone | Straight length, bead position and old witness mark | The clamp must sit on the intended supported area |
| Routing envelope | Maximum width/height and surrounding clearances | Prevents contact with fan, belt, frame or hot surface |
| Protection | Sleeve, guard, clip and insulation locations | These items control abrasion and heat exposure |
Inspect clamps, necks and coolant condition as one job
Clean and inspect the radiator and engine necks after hose removal. Look for corrosion, pitting, distortion, sharp edges and cracked fittings. Confirm the correct clamp type and size from the service information. A clamp placed partly over a bead, on a curved section or beyond the insertion area may not seal evenly.
Cummins’ cooling-system maintenance guidance calls for inspection of hoses and clamps for leaks, damage, corrosion, softening and looseness, while warning against using sealing additive as a substitute for repair. The document serves a named engine application, so use its inspection logic rather than copying its coolant mixture or service interval to another engine.
Inspect drained coolant for oil, rust, particles or incompatible mixtures and follow the engine procedure for correction. A contaminated or overpressurized system can damage the replacement. Check the radiator, cap, thermostat, pump and fan only as directed by the relevant diagnostic procedure; a hose is one part of the heat-rejection circuit.
Prepare a hose RFQ that can be compared
Send the machine make, full model, serial plate and engine identity. Include the parts-book reference, every printed hose number, installed photos and the relaxed geometry sheet. Name the circuit and endpoints in plain language. State whether the request includes clamps, sleeves, clips or adjoining pipes.
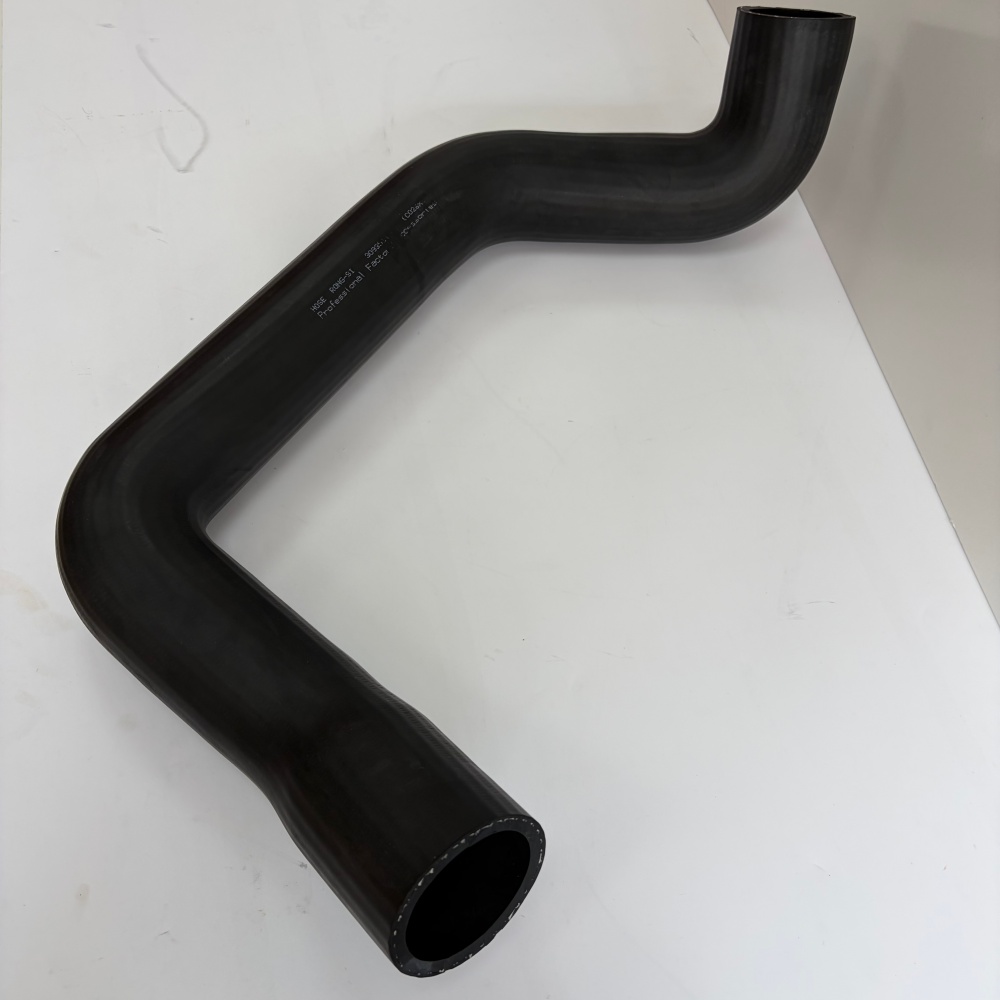
Hongtengda currently lists two visually different candidates for the ZAX330 family: an upper radiator hose associated with 3093511 / YA00000849 and another upper hose associated with 3089835 / YA00000848. The current hose product category is an enquiry entry point. Similar model wording does not prove that the bends, endpoints or serial ranges are interchangeable.
| RFQ line | Buyer provides | Supplier confirms |
|---|---|---|
| Application | Machine and engine plates, serial numbers and configuration | Fitment basis and serial limitation |
| Part identity | Printed hose numbers and parts-book reference | Quoted number and cross-reference |
| Ends and bends | Diameters, insertion lengths and orientation photos | Comparable drawing or annotated product photos |
| Material duty | Coolant type and operating application from manual | Hose material intended for that coolant circuit |
| Supply scope | Required clamps, sleeve, clips and adjoining items | Included and excluded components |
| Dispatch evidence | Order reference and approved comparison sheet | Photos of actual hose, markings and both ends |
Finish with a cold-hot-cold leak record
Before fitting, compare the new hose with the relaxed old-hose template. Do not force or trim a molded replacement unless the approved procedure and part specification allow it. Install it without twist, seat both ends to the correct depth, position the clamps as specified and restore every support and protective sleeve. Rotate or inspect nearby moving parts only through the safe method in the service procedure.
Refill with the specified coolant and bleed the system using the machine procedure. Check for leaks and hose collapse during initial circulation, then inspect again at normal operating temperature from a safe position. After the machine cools fully, recheck level, joints, clamp position and contact marks. Do not put hands near a suspected pressurized leak.
The final record should contain the installed part number, coolant used, clamp and routing confirmation, cold/hot observations and the corrected cause of the original failure. If identification remains uncertain, send the complete evidence package through the Hongtengda enquiry page before installation. A defensible replacement matches the serial-numbered cooling circuit and follows its route without twist, kink or contact.