A leaking main pump does not automatically need a complete replacement. In some cases, a correctly identified excavator hydraulic pump seal kit supports a controlled rebuild. In other cases, worn shafts, bearings, housings, valve plates or rotating parts make a seal-only repair inappropriate. This guide helps a repair workshop define the failure, protect the hydraulic system and build an evidence-based parts request before opening the pump.
Define what the leakage evidence proves
Clean the pump exterior and identify the first wet point under controlled operation. Oil running from a hose, fitting or regulator can collect around the pump shaft or joint and imitate a housing leak. Record whether leakage appears at the input shaft, a cover joint, a control interface, a plug or a hose connection. Note oil temperature, engine condition and the function being operated. Do not use a hand to locate a pressurized leak.
The UK HSE warns that high-pressure hydraulic fluid can penetrate skin and recommends safe isolation and suitable detection methods in its hydraulic fluid safety guidance. Lower the attachment, stop the engine, prevent starting, release stored pressure by the machine procedure and verify isolation before cleaning or disassembly.
| Observed evidence | Possible repair scope | Evidence still required |
|---|---|---|
| External leak at a known joint | Local seal or gasket service may be possible | Joint condition, fastener condition and pump identity |
| Leak at input shaft | Shaft seal plus inspection | Shaft surface, bearing play and case-pressure cause |
| Metal in oil or abnormal noise | Full teardown or pump replacement may be required | Filter inspection, contamination review and internal measurements |
| Low performance without leakage | A seal kit alone may not correct the fault | Pressure, flow, control and leakage diagnosis |
Identify the exact pump before selecting a kit
Record the excavator model and complete serial number, then photograph the pump plate without glare. Capture the manufacturer, pump model, assembly number and all suffixes. Photograph the regulator, pilot pump, flange, shaft and port orientation. A replacement kit must match the installed pump configuration, not only the excavator model printed in an online title.
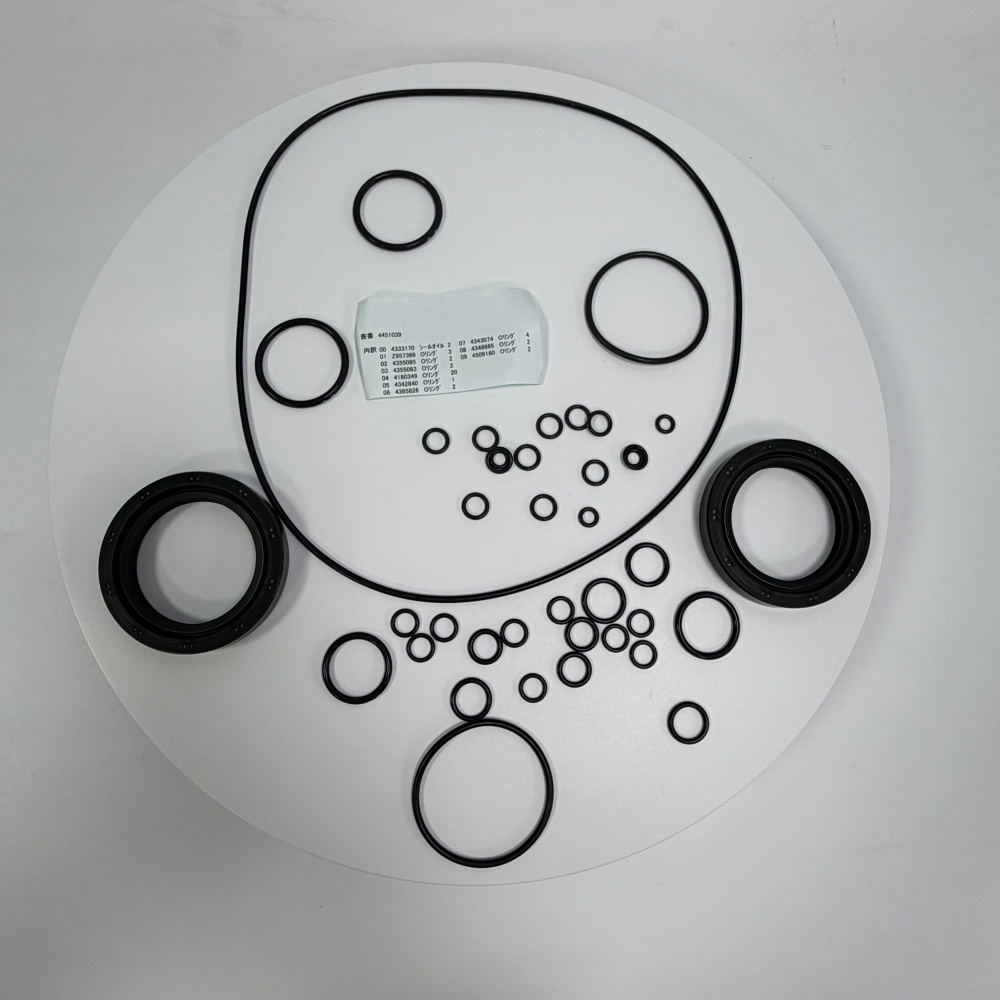
Hongtengda lists a Hitachi ZAX330-3 seal kit associated with 4451039, a ZAX120-6 / ZAX130-5A pump repair-kit listing, and a ZX330 / ZX400-series repair-kit listing. These are enquiry candidates. Their catalog wording does not prove interchangeability or the contents required for an unidentified pump.
Decide whether seals are the repair or only the symptom
Check the reason the seal failed. Excessive case pressure, a restricted drain, shaft runout, damaged bearings, heat, contamination or incorrect assembly can damage a new seal quickly. Measure only with the equipment and conditions specified by the pump or machine manual. If the pump is weak, noisy or contaminated, include performance and oil evidence in the repair decision instead of assuming that stopping the visible leak restores the pump.
Danfoss emphasizes clean working conditions, immediate capping of open lines and careful inspection in its MP1 pump service manual. Its dimensions and procedures do not apply to the Hitachi kits above, but the contamination-control principle does. Parker’s variable pump service manual also shows why shaft, bearing, control and case conditions belong in the same failure review.
| Inspection point | Accept only by | Why it affects the decision |
|---|---|---|
| Shaft sealing surface | Specified visual and dimensional criteria | A groove or runout can damage the new lip |
| Bearings and shaft support | Manual limits and measured condition | Movement changes seal alignment |
| Case drain path | Correct routing and test result | Restriction can raise housing pressure |
| Oil and filter debris | Documented inspection or analysis | Debris may indicate internal wear beyond seals |
| Mating surfaces | Clean, undamaged condition | Scratches and distortion create repeat leakage |
Control the teardown and seal installation
Photograph the pump before removal, tag every connection and cap each opening immediately. Keep removed parts in order and separate dirty exterior work from clean internal work. Use soft tools at sealing grooves and inspect every old component before disposal. The pattern of a cut O-ring, hardened lip, extruded ring or polished shaft can point to installation damage, heat, pressure or movement.
Make a position map before lifting the first internal seal. Number each location on a pump outline and place the removed component beside the same number on a clean sheet. Record sealing direction, backup-ring side and any chamfer or spacer. This matters because a kit may contain several rings with nearly identical diameters but different sections or materials. If the old component is broken or swollen, use the groove and the parts documentation as evidence rather than treating its distorted size as the specification.
Compare the proposed kit with the removed seals by position, material marking, profile and dimensions. Do not stretch, trim or substitute a similar-looking ring. Follow the exact manual for orientation, lubrication, assembly aids, fastener sequence and torque. The video below documents a Hitachi EX120-2 excavator hydraulic pump rebuild and clearly shows the scale and cleanliness of a full pump job; its part sequence and settings must not be transferred to another pump.
Build a seal-kit RFQ from interfaces and scope
Use the Hitachi oil seal product category to find possible kits, then send evidence for written comparison. State whether the request is for external seals, a complete pump reseal kit or a broader repair kit. Ask the supplier to list included components or provide a laid-out photograph. Confirm whether shaft seals, O-rings, backup rings, gaskets and control-interface seals are included, rather than relying on the word “complete.”
Include photos of every label and the removed seal layout when available. State the machine’s full serial number, pump number, regulator configuration, observed leak point and any internal damage. Request the fitment basis used in the quotation and record any interfaces the workshop must still verify.
| RFQ field | Evidence to send | Decision protected |
|---|---|---|
| Machine identity | Model and full serial plate | Production-range selection |
| Pump identity | Maker, complete plate and suffixes | Correct pump family and variant |
| Repair scope | Leak location and teardown findings | Seal kit versus wider rebuild |
| Seal evidence | Laid-out old seals, dimensions and positions | Kit-content comparison |
| Commercial scope | Required contents, documentation and packaging | Comparable supplier quotations |
Commission the rebuilt pump with a cause check
Flush or clean affected circuits according to the contamination findings. Keep caps in place until each connection is ready, renew specified filters and use the approved fluid. Prime and bleed by the machine procedure. Start at the required conditions and watch for abnormal noise, delayed response, heat and leakage. The troubleshooting structure in Danfoss’s D1 pump service manual reinforces checking inlet condition, controls, leakage and operating temperature together, although its values do not apply to the listed Hitachi pumps.
Use staged acceptance instead of applying full load immediately. Confirm oil level and a quiet initial rotation, then check neutral condition, low-demand movement and the specified warmed operating test. Inspect all repaired joints between stages. Compare response between functions and, where the machine has tandem sections, between pump sections. A stable record across stages is more useful than a single final reading because it can reveal aeration, delayed priming or a leak that appears only as temperature rises.
Reinspect after a controlled warm-up and again after an agreed working period. A dry housing is only one acceptance point. The pump must also respond correctly, the hydraulic oil must remain clean and the original cause—such as drain restriction, shaft movement or contamination—must be corrected. Preserve the pump identity, kit number, measurements, photos and commissioning record for the next service event.